sides

Sunday, August 12, 2012

Avocado Tree

I am the worlds biggest avocado fan! HUGE! I was visiting my best friend Erin's home in Maryland and her mother had a tree that she had started from the pit. This was news to me and the best thing ever. So I started one myself over a year ago. His name is Hass Cado. He's getting very big.

So next time you get an avocado, I encourage you to try this.

 Take the pit out! 

 Wash off the pit...

 Grab some toothpicks(3) and stab them into the avocado

 Place the pit into a dish and fill with water till it comes up to about half way on the pit. It must always have that amount of water in it.

Put it somewhere there is sun but not too much. I don't have pictures (sorry) but the pit will crack open and a root will start to grow down and the tree will start to come up through the top. 

Place the pit into a pot and add soil. This one has not grown that fast so I kept the top visible till he sprouts up! Then I will cover the pit.

Please allow me to introduce HASS CADO!

 I have been fighting with him to grow straight so that explains the chop sticks and twine. He has gotten so big int he past month.

This is Bella.....she wanted to say hello. 

So my husband googled when Hass will start to produce avocados....if ever. In about 15 years we should be sitting pretty in avocado land!!!!

Cheers
Robin

Friday, August 10, 2012

Unique Wedding Sign- go ahead try not to cry....

So I was browsing pinterest in the wedding section and I came across this sign. This little ring bearer was holding a sign walking down the aisle. The sign read "Uncle Mike, here comes your girl" Oh man, THE TEARS STARTED FLOWING. Not only was it adorable, but my brothers name is Mike and he was getting married. I pinned that sucker and showed it to my soon to be sister-in-law. She loved it. So I decided that I must make this sign for my brother as a surprise.

First, I was going to need my amazing fathers help with this project. He is a genius craftsman who built every house that I lived in growing up....yes, plural...he's the best. So my husband and I traveled up to the Adirondacks to my fathers lake house and my father and I got to work. This project ended up taking us about an hour and half but after all the staining and waiting and staining...a solid 24 hours.

I think this sign is something I would like to make for bride and grooms. I haven't decided yet considering I do not own any of the tools that I would need. Table saw, router, sander, etc. I would love some feedback from you. Would you buy this product?

The original sign that I saw was hand painted. My brother pretty much lives outside so I wanted to sign to be more rustic looking, more him! So I (my dad) cut the wood to a "Kid Friendly" size and sanded it down and outlined the words with pencil. Then came the fun part....the router. After I had finished with the router, I took a dark stain to the letters. Once I was satisfied with that, I stained the whole thing for a nice glossy finish.

And Voila!

So, would you buy this sign? Would love some feedback!

Cheers,
Robin

Regrowing Scallions

Did you know you can regrow scallions? Yeah...me neither. But what  great thing to do. All you have to do is cut the white ends with the root off and stick them into a little dish full of water. I placed a small paper towel folded up on the bottom of the dish....I'm not sure why I did it so it's up to you if you want to use the paper towel or not...am I still talking? Anyway, they pretty much start regrowing right away. I used them within the a week. Enjoy.


(please pardon my gross windowsill)

Cheers!
Robin


Sunday, June 24, 2012

Sassy Water

Hi!

I came across this recipe on Pinterest....what else is new? So I tried this water out this past weekend and it's so refreshing and tastes great. It says the water is suppose to help you maintain a flat belly. I don't know if that is really true but it tastes GREAT! I doubled the recipe in the picture.

Here's what you need to do:

It's very easy to make: in 2 l water add 1 medium cucumber, peeled and thinly sliced, 1 lemon, thinly sliced, 1 teaspoon freshly grated ginger and around 10 spearmint leaves.
leave in the fridge for a few hours or overnight and in the morning you'll have a cold and really refreshing drink.

Enjoy guys!

Robin

Maple Syrup Cookies

Hello Everyone,

Sorry it has been a while. But I'm back...I know you were worried. Anyway, my brother, Mike, made this amazing Maple Syrup from VERMONT TREES last year. I was lucky enough to get a couple pints from him. I decided to search good old Pinterest for a recipe and I wanted to share it with you! Next time I may add pecans...YUM!


Maple Syrup Cookies
So buttery, fluffy and moist these cookies are truly a worthwhile indulgence.

1 cup butter, softened
1 cup packed brown sugar
1 egg
1 cup real maple syrup
1 teaspoon vanilla extract
2 teaspoons baking soda
1/2 teaspoon salt
4 cups all-purpose flour
Granulated or organic sugar for rolling

Preheat oven to 350 degrees. Line cookie sheets with parchment paper.

In a large bowl, cream the butter and brown sugar. Add the egg, syrup and vanilla. Mix until well blended. Sift together the flour, salt and baking soda. Stir into mixture until well blended. Shape into 1 inch balls and roll in sugar. Place on cookie sheets about 2 inches apart and flatten slightly.

Bake 8 to 10 minutes in the preheated oven. Let cool on wire rack.

Makes about 60 cookies.

Enjoy everyone!

Friday, June 1, 2012

Shaving with Conditioner

Hello Ladies and Gents...It's been way too long.

So this may be old news to most people but it's new to me. I am not the type of leg shaver that uses shaving cream. I don't know why but it just annoys me. I always use soap or nothing at all....I know I know...gross. But the other day I came across a website that said to try using conditioner. So I tried it last night and it was fantastic. I didn't even have to put on lotion after. For all you shaving cream fans, it does not lather up like a typical cream so it may be hard for you....but you have probably been shaving for 15+ years so you should pick it quickly :) haha.

This new discovery is AWESOME because I have a giant Costco size bottle of conditioner in my shower. It's the little things.

-Robin


Sunday, May 6, 2012

Homemade Ice Cream

So after I partied my pants off all weekend at the Bachelorette party, I came home to homemade Cherry Garcia ice cream. Nice work hubs! It is such a good recipe I wanted to share it with you. The secret is in the cherries. My brother-in-law buys the Luxardo Cherries in syrup from the store. They may be hard to find but don't give up!Also, you need to have an ice cream maker. Without this, you will fail....sorry...

What you will need:'

1/4 cup of shaved chocolate (Brady used Godiva. He doesn't mess around)
1 cup of Luxardo Cherries in syrup 
2 Large Eggs
3/4 cup of sugar
2 cups of heavy cream
1 cup of whole milk
1 tsp. of vanilla extract


First chop up the cherries and shave the chocolate.


LOOKS LIKE BLOOD!!!!Put them in two separate bowls and in the refrigerator.
Then in a large mixing bowl beat the eggs for two minutes. It's important that they look light and fluffy. Continue whisking and add the sugar a little at a time. Add the cream, milk and vanilla and whisk to blend.
 Transfer the mixture to an ice cream maker and run the machine for about 15 minutes. After 15 minutes add in cherries and chocolate and run for another 5 minutes. Transfer ice cream to air tight container and put in the freezer till frozen. THEN EAT IT! 


Hope you enjoy it as much as I did! 

xoxo
Robin

All around Great Wedding Ideas!

Well Hello there!

This weekend was the lovely Bridal Shower/Bachelorette Party for my soon to be sister-in-law Melissa, who is awesome, by the way. So this post is dedicated to some awesome affordable ideas for wedding festivities.

First, my mother, who is one crafty lady, was asked to put together a center piece for the shower for Melissa. She was told it needed to represent the life Michael (my brother...duh) and Melissa have together in Vermont. Here is a little inside on my brother. He hunts, he fishes, he remodels homes and boats and pretty much everything, he makes his own maple syrup, he cooks, he cleans, he aqua logs and builds things with those logs.....the list goes on and on but you get my drift. He is AWESOME! So, as you can imagine, it was hard for my mother to narrow this idea down. But she did.

This is such an amazing idea for center pieces at a wedding.

She took an old log and a bunch of old maple syrup taps and hammered the taps all around the log. Then she hung pictures of the two of them all around it. She used a glue gun for the moss on the top. Now, the bird's nest is actually real...BUT before you freak out, the birds had moved out. So it was vacant. Anyway, I thought I would share the centerpiece with you!
The downside to using a log....it weighs like 100lbs.


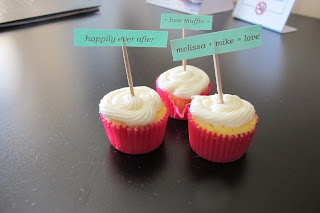
Ok, so another talent person in my life is my friend Stephanie. She made these amazing little Muffins with vanilla icing. She made personal little tags and taped them to toothpicks. How cute are these? Great idea also for a baby shower!


So, on to the bachelorette party. What a wild night. What every wild Bachelorette party needs are PENIS COOKIES! I found the cookie cutter at iParty! These are so simple I'm kind of surprised there are not always penis cookies fully stocked in my house.
Anyway, I just picked up a Betty Crocker Sugar Cookie mix from the store and made the cookies with the cutter. It took me about an hour and a half to make the cookies. Next, we had to ice them. So I recruited my Father, Uncle and Aunt to help with the process. I bought white icing and put about three drops of red food dye in the icing and mixed it well. The pink is perfect. To really bring it all together though...I used brown jimmies for hair....and voila!


It was a great weekend.

xoxo
Robin

Tuesday, May 1, 2012

Packing While Drinking....

Packing while drinking should be illegal. This tends to happen to me a lot. By the time I'm done with every little thing that I need to get done for the weekend travels....I'm buzzed! I can't help it. It just happens people!

It pretty much goes down like this: I start to pack and manage to lay my things on the bed. Take a sip of wine. I start to pull things off the hangers in the closet that do not match. Take a sip of wine. Try to remember what I was doing. Take another sip of wine. Remember I need something in the kitchen. Head to the kitchen and then forget what it was that I needed in the kitchen. Can't find my wine. WHERE THE HELL IS MY WINE? Head back to the bedroom. Locate the wine on the dresser. Continue to pack my bag with 1 pair of underwear and 10 pairs of socks. I start packing summer stuff even though I'm heading to VT and it's going to be in the 50's all weekend. Pair of shorts, t-shirts, couple of sundresses....no sweatshirts though. I won't need that. Oh and Flips flops too! Can't forget those. Break time. Take another sip. Remember what I needed in the kitchen. Head to kitchen. Grab more wine. Leave kitchen without getting what I needed. Head back to bed room. Everything looks great! Pack up the bag. Celebrate my accomplishment with more wine and sit on the couch.

My husband is always amazed with my super fast packing skills. Little does he know I usually have to go shopping when we reach our destination because I have forgotten at least one important item, like underwear or a bra or pants....that did happen once. Who doesn't pack pants? This girl!

The only upside to packing while drinking....the element of surprise when you unpack your bag...but that doesn't last long when realize you have no pants.....

But I never learn my lesson...it just keeps happening and I'm ok with that!

xoxo
Robin

Sunday, April 22, 2012

No Knead Bread

There's nothing better than a great bread recipe that doesn't require kneading. Boo to kneading! My step-father Dutch found this recipe on Youtube. Mark Bittman's No Knead Bread. Here is the link if you are interested in making just a plain bread or need the video in case my recipe makes no sense...which could happen.

Anyway, this bread is not only delicious, it's easy and CHEAP!

What you will need:

Dutch Oven
3 cups of Flour
1/4 tsp of Active Dry Yeast
1 1/4 tsp of Salt
1 cup of chopped Pecans 
1 tbsp of Sugar
1 cup of Crasians
1 Large Orange for the rind
1 1/2 cups of warm water

(TIP: After the 12 hours of rising, before you take the bread out of the bowl, preheat the oven at 450 for 30 minutes with the top on. Just nice to have that ready to go when you finish folding the bread)

Chop and saute the pecans for about 10 minutes. Don't let them burn. I did not add oil or butter to the pan. They are dry.

 YUM! I love pecans!


 Add all the dry ingredients in the bowl. Blend them all together with a wooden spoon. 


Grate the whole the orange and add to the bowl of dry ingredients.


 Blend well. 


Add the water to the bowl and with a wooden spoon, blend the mixture. It may take a little muscle to mix it well. 


Cover the top with Saran Wrap. Really tight! 

 
Poke a small hole in the top of the Saran Wrap and let the bread rise for 12 hours.  


 Almost there! Yum!


 Sprinkle some flour on the counter top for the bread.

 
 Drop the bread onto the flour and cover both sides with flour. Shape the bread into a circle and fold over four times. This may sound confusing so the video posted from youtube may help. My husband was sleeping so I couldn't take a picture while trying to fold it over.


 Preheat the oven at 450 for 30 minutes with the dutch oven in the oven with the top on. (from the tip in the beginning of the blog)


 Be careful taking the top off. It's going to be super hot!!! Place the bread into the dutch oven FOLDED SIDE UP! I know this may seem weird but this will give the bread that Mohawk look!
Put the cover back on the dutch and cook for 30 minutes. After 30 minutes take the top off the dutch oven and cook for another 20 minutes.


DONE! Take it out and let it cool for about 10  minutes or so. It's so good fresh out of the oven with a little butter! Oh man! 

Enjoy.

xoxo
Robin


Cleaning the Stove Top Grates

Our stove top grates are SO GROSS. I have tried soaking them in hot water with soap and nothing seems to get all that left over grossness off the grate. So, of course, I turned to Pinterest. My Best Friend. I found this cheap great idea and it worked! 

What you will need:

Ziploc Bags
Ammonia

That's it!

 This is my poor excuse of a grate....barf


Place the grate in a ziploc bag with 3 tablespoons of Ammonia and let it sit for 12 hours. So don't plan on cooking. 

12 hours later....and I came so close to throwing up.
I opened the bag and dumped out the ammonia and added water to the bag. I shuck it up like old fashion shake and bake and SO MUCH caked on crap came off the grate. The bag also ripped so shake with caution. 
Wish some hot water and a sponge, I cleaned the grate and almost everything came off. 


SEE!!!!

I was so excited about it that I threw all the other grates into ziploc bags. 


I'm so screwed for dinner tonight...

xoxo 
Robin

Saturday, April 21, 2012

Affordable Cat Bed

Do you have a high maintenance cat? I sure do. Here is a great affordable cat bed! 
This is what you need to do. 

1. Order something for yourself online that requires stuffing
2. Wait for the package to arrive
3. When the package arrives, open it and take everything out of the box but leave the stuffing
4. Place the box on the floor
BOOM

 She's so weird. 

xoxo
Robin


Oh that's no fun...

I couldn't help but laugh when I walked into the office and saw this. My poor husband....


Just wanted to share a good laugh. 

xoxo
Robin

Friday, April 20, 2012

Welcome

Well, hello there. Thanks for checking out my blog. I have been wanting to start a blog for a while and I think now is the best time for me to start. I see all these great blogs every day about crafts and cooking and I think to myself "Well, I can do that....maybe...some day" WELL THAT SOME DAY IS TODAY!

So this is me in a nut shell...


 I like to have a good time. Wine is going to be present through most of this blog. Just a warning. But I will show you cool things to do with all those corks! So tip those drinks back, Ladies and Gents. The more corks the better!
So I named my blog "Keeping it Vermont" for a couple reasons. Well, I grew up in Vermont in little town that was about 30 minutes to anything fun and it was awesome. I was very much a tomboy having two older brothers. I'll never forget my freshman year of high school when I wore brown carharts and a green flannel button down and thought I looked good. No wonder I never got a boyfriend that year. HA! Anyway, off track...shocking.
I left VT to move to Boston when I was 25. Boston is wonderful. Having the ocean only a minute walk from me is amazing. But there's nothing like going home. The air is so clean. The people are polite when they drive....although it is very hard to keep your composure when they drive under the speed limit. GRR!
I am still very much a country girl and even though I live in the city with no back yard for a garden, no driveway to park my car, packages are not safe on your stoop and I have no idea who my neighbors are, I make do in my tiny apartment I share with my husband.
So I hope you enjoy what I have to share with you. It will most likely be all over the board...like me.

Oh and this is my cat Bella. She hates living in the city.


Makes her sick!


xoxo
-Robin